Spring Security란?
- 사용자 정의가 가능한 인증 및 권한 부여가 가능한 프레임워크
- Spring을 사용한 애플리케이션에서 사실상 표준
- 전적으로 servlet filter를 기반으로 한다.
- Filter는 서블릿에서 오고 가는 요청과 응답을 intercept(가로채기)할 수 있고 전처리 후처리가 가능하다.
Browser - request -> servletRequest -> filter -> Servlet (요청 과정)
Servlet -> filter -> servletResponse -> response -> Browser (응답 과정)

예시)
controller
package com.naver.daehwan;

import org.springframework.stereotype.Controller;
import org.springframework.ui.Model;
import org.springframework.web.bind.annotation.RequestMapping;

/**
 * Handles requests for the application home page.
 */
@Controller
public class HomeController {

	@RequestMapping("/public")
	public String accessPublicPage(Model model) {
		model.addAttribute("message", "public 페이지, 인증 필요 x");

		return "public";
	}

	@RequestMapping("/secured/myapage")
	public String accessSecuredPage(Model model) {
		model.addAttribute("message", "secured 페이지, 인증 필요");

		return "secured/mypage";
	}

}
View(인증이 필요한 View, 필요하지 않은 View)
<%@ page language="java" contentType="text/html; charset=EUC-KR"
    pageEncoding="EUC-KR"%>
<!DOCTYPE html>
<html>
<head>
<meta charset="EUC-KR">
<title>Public 페이지</title>
</head>
<body>
	<h3>${message}</h3>
</body>
</html>
<%@ page language="java" contentType="text/html; charset=EUC-KR"
pageEncoding="EUC-KR"%>
<!DOCTYPE html>
<html>
<head>
<meta charset="EUC-KR">
<title>Secured 페이지</title>
</head>
<body>
<h3>인증 했구나</h3>
<h5>${message}</h5>
</body>
</html>Pom.xml( Spring security dependency 추가 )
    	<properties>
		...
		<spring-security-version>4.2.3.RELEASE</spring-security-version>
	</properties>

    ...
    <!-- security -->
		<dependency>
			<groupId>org.springframework.security</groupId>
			<artifactId>spring-security-core</artifactId>
			<version>${spring-security-version}</version>
		</dependency>

		<dependency>
			<groupId>org.springframework.security</groupId>
			<artifactId>spring-security-web</artifactId>
			<version>${spring-security-version}</version>
		</dependency>

		<dependency>
			<groupId>org.springframework.security</groupId>
			<artifactId>spring-security-config</artifactId>
			<version>${spring-security-version}</version>
		</dependency>
- 버전을 동시에 관리하기 위해 placeholder로써 spring-security-version 속성을 정의
Web.xml
	<context-param>
		...
		<param-value>/WEB-INF/spring/appServlet/security-context.xml</param-value>
	</context-param>

    	<filter>
		<display-name>springSecurityFilterChain</display-name>
		<filter-name>springSecurityFilterChain</filter-name>
		<filter-class>org.springframework.web.filter.DelegatingFilterProxy</filter-class>
	</filter>

	<filter-mapping>
		<filter-name>springSecurityFilterChain</filter-name>
		<url-pattern>/*</url-pattern>
</filter-mapping>- DelegatingFilterProxy: 모든 요청을 intercept 하는 역할 ( url-pattern을 루트로 설정했기 때문에 모든 요청을 intercept 한다.)
- 권한 체크를 했을 때 권한이 없으면 DelegatingFilterProxy에 의해서 가로채 져서 URl이 변경되어 다른 페이지로 보내진다.
- context-param 속성에 security-context.xml 경로를 추가하여 security 설정 파일을 적용한다.
security-context.xml
<?xml version="1.0" encoding="UTF-8"?>
<beans xmlns="http://www.springframework.org/schema/beans"
	xmlns:xsi="http://www.w3.org/2001/XMLSchema-instance"
	xmlns:security="http://www.springframework.org/schema/security"
	xsi:schemaLocation="http://www.springframework.org/schema/security http://www.springframework.org/schema/security/spring-security-4.2.xsd
		http://www.springframework.org/schema/beans http://www.springframework.org/schema/beans/spring-beans.xsd">
	<security:authentication-manager>
		<security:authentication-provider>
			<security:user-service>
				<security:user name="kwon" authorities="ROLE_USER" password="1234" />
			</security:user-service>
		</security:authentication-provider>
	</security:authentication-manager>
	<security:http auto-config="true" use-expressions ="true">
		<!-- <security:intercept-url  pattern="/secured/**" access="hasRole('ROLE_USER')"/>  -->
		<security:intercept-url  pattern="/secured/**" access="isAuthenticated()"/>
		<security:intercept-url  pattern="/" access="permitAll"/>
		<security:intercept-url  pattern="/home" access="permitAll"/>
		<security:intercept-url  pattern="/resources/**" access="permitAll"/>
		<security:intercept-url  pattern="/**" access="denyAll"/>
	</security:http>
</beans>
- name이 kwon라는 유저를 추가하고 ROLE_USER 권한을 부여하였다.
- user의 password는 현재 코드처럼 노출되어 있으면 안 되므로 인코딩 작업이 필요하다.( 나중에 )
- auto-config: true로 값을 주면 인정 절차가 Spring에서 이루어지게 된다(DB에 데이터 존재 유무.. 등);
- use-expressions: 권한 부여 메커니즘으로 Spring EL 표현식 사용
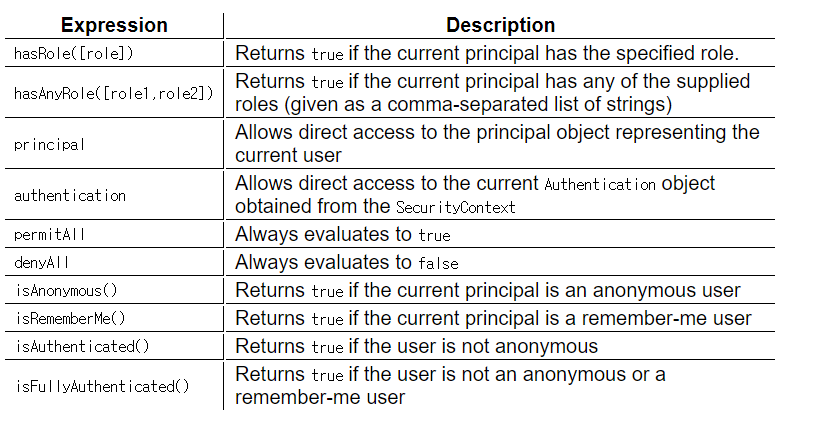
- <intercept-url>: 보안이 필요한 요청 URL에 대한 패턴을 정의한다.
속성 access는 해당 패턴과 일치하는 요청된 URL을 볼 수 있는 권한이 있는 사용자의 역할을 정의.
결과
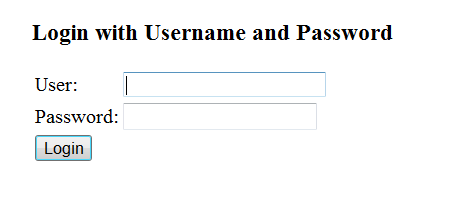
- 인증이 안된 상태에서 secure 된 페이지에 접근하려고 한다면 DeligatingFilterProxy에 의해 intercept 되고 로그인 페이지를 따로 만들지 않았다면 Spring에서 제공하는 login 페이지로 redirect 된다. ( http://... )
--> Spring에서 제공한다는 뜻은 개발자가 따로 login 페이지를 만들지 않아도 로그인을 할 수 있는 페이지를 Spring이 제공해 준다는 뜻이다.( 물론 아래와 같이 매우 간단한 형태 ) - Login을 한다면 Spring Security에 의해 요청한 페이지로 다시 redirect 해준다.
- Database를 사용하여 인증하는 방법
<?xml version="1.0" encoding="UTF-8"?>
<beans xmlns="http://www.springframework.org/schema/beans"
	xmlns:xsi="http://www.w3.org/2001/XMLSchema-instance"
	xmlns:security="http://www.springframework.org/schema/security"
	xsi:schemaLocation="http://www.springframework.org/schema/security http://www.springframework.org/schema/security/spring-security-4.2.xsd
		http://www.springframework.org/schema/beans http://www.springframework.org/schema/beans/spring-beans.xsd">
	<security:authentication-manager>
		<security:authentication-provider>
			<security:user-service>
				<security:user name="kwon" authorities="ROLE_USER" password="1234" />
			</security:user-service>
		</security:authentication-provider>

        <security:authentication-provider>
		<security:user-service data-source-ref="dataSource"
            		users-by-username-query=
                		"select username, password, enabled from users where username = ? "
                	authorities0by-username-query=
                		"select username, autheority orm authorities where username = ?" />
		</security:authentication-provider>
	</security:authentication-manager>


...
</beans>
- users 테이블로 유저의 id와 비밀번호를 체크하고 동시에 authorities 테이블로 user의 권한을 체크한다.
-
커스텀 로그인 페이지 만들기
- 디포트 LoginView는 delegationFilter에서 보내줬다면 개발자가 만든 로그인 뷰는 원래대로 컨트롤러에서 보내준다. 즉, 로그인 로그아웃하는 인증 절차는 Spring에서 이루어지지만 View는 개발자가 설정할 수 있다.
- <form-login> 태그를 사용하면 디폴트 세팅이 아닌 내가 만든 로그인 페이지 url를 사용할 수 있다.
ex) <security:form-login login-page="/login" />
<security:http auto-config="true" use-expressions="true">
  <security:intercept-url pattern="/admin/**"
			access="hasRole('ROLE_ADMIN')" />
  <security:form-login login-page="/login" />
</security:http>
- 인증 요청 시, /login으로 브라우저를 redirect
- /login이 요청될 때 Controller가 받고 View에게 login page 렌더링 지시
- 인증 실패 시, /login? error(디폴트 값)로 브라우저를 redirect
- logout에 성공 시, 브라우저를 /login? logout(디폴트 값)으로 redirect
- /login?logout 요청 시, Controller가 요청을 받고 View에게 logout 확인 페이지 렌더링 지시
<security:form-login 속성>
| Attribute | Default Value |
| login-page | /login |
| username-parameter | username |
| password-parameter | password |
| login-processing-url | /login, POST |
| authentication-failure-url | /login?error |
-> login-processing-url: 실제로 username과 password를 받아 인정 절차 하는 것은 Spring이다.
즉, 이 속성 값은 Spring에게 요청되는 url과 method이다.
예시)
LoginController
@Controller
public class LoginController {

  @RequestMapping(value=“/login”, method = RequestMethod.GET))
  public String login() {

  	return "login";
}
login.jsp
<form action="<c:url value="/login" />" method='POST'>

  <table>
    <tr><td>User:</td><td><input type='text' name='username' value=''></td>   </tr>
    <tr><td>Password:</td><td><input type='password' name='password' /></td>  </tr>
    <tr><td colspan='2'><input name="submit" type="submit“ value="Login" /></td> </tr>

    <input type="hidden"  name="${_csrf.parameterName}"value="${_csrf.token}"/>
  </table>

</form>
- jstl의 url 태그를 사용하여 context url에 /login을 붙여 요청
- csrf : 웹 보안을 위해 처음 서버에서 브라우저로 토큰을 나눠준 다음 브라우저에서 요청을 할 때마다 토큰을 가지고 서버에 요청!! 만약 토큰이 없거나 만료되거나 다르다면 요청을 거절한다.
- submit을 눌러 로그인 요청(url: /login, method: post) -> Spring이 database에 접근하여 인증 절차를 밟는다.
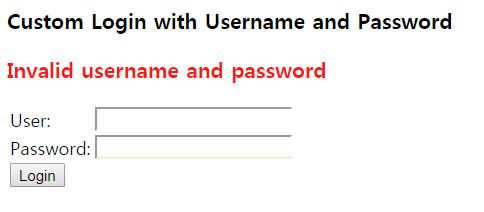
★인증 실패!!
LoginController
@Controller
public class LoginController {

  @RequestMapping(value="/login", method = RequestMethod.GET))
  public String login(@RequestParam(value="error", required=false)
			String error, Model model) {

  if(error != null) {
    model.addAttribute("errorMsg", "Invalid username and password");
  }

  return "login";
}
- 인증에 실패할 시 controller에 error 쿼리 값을 포함하여 GET 요청을 한다.
- @RequestParam으로 error 쿼리 값을 받고 required=false로 주어 쿼리 값이 없는 경우(login 페이지 접근)도 같이 처리할 수 있게 한다.
- error값이 들어온다면(null이 아니라면) 에러 메시지 추가
login.jsp
<form action="<c:url value="/login" />" method='POST'>

  <c:if test="${not empty errorMsg}">
        <div style="color: #ff0000;"> <h3> ${errorMsg} </h3></div>
  </c:if>

  <table>
    <tr><td>User:</td><td><input type='text' name='username' value=''></td>   </tr>
    <tr><td>Password:</td><td><input type='password' name='password' /></td>  </tr>
    <tr><td colspan='2'><input name="submit" type="submit“ value="Login" /></td> </tr>

    <input type="hidden"  name="${_csrf.parameterName}"value="${_csrf.token}"/>
  </table>

</form>
- jstl을 사용하여 Controller에서 전달해온 Model에 errorMsg가 들어있다면 표시
★로그아웃!!
<c:if test="${pageContext.request.userPrincipal.name != null}">
  <a href="javascript:document.getElementById('logout').submit()">Logout</a>
</c:if>

<form id="logout"  action="<c:url value="/logout" />"method="post">
  <input type="hidden" name="${_csrf.parameterName}"value="${_csrf.token}" />
</form>
- login과 마찬가지로 csrf을 넣어 주고 /logout url로 post 요청을 한다.
- security-context.xml에 security:form-login과 같이 security:logout 설정이 가능하다.
<security:logout> 속성
| Attrubute | Default value |
| logout-url | /logout, POST |
| logout-success-url | /login?logout |
- 로그인과 마 친가지로 logout 절차는 Spring에서 담당한다.
LoginController
@RequestMapping(value="/login", method = RequestMethod.GET)
public String login(
    @RequestParam(value = "error", required = false) String error,
    @RequestParam(value="logout", required=false) String logout,
    Model model) {

    if (error != null) {
        model.addAttribute("errorMsg", "Invalid username and password");
    }

    if(logout != null) {
         model.addAttribute("logoutMsg", "You have been logged out successfully ");
     }

     return "login";

}
- error와 마찬가지로 logout 파라미터가 들어오는 경우 model에 속성을 추가해준다.
<c:if test="${not empty logoutMsg}">
    <div style="color: #0000ff;" > <h3> ${logoutMsg} </h3></div>
 </c:if>
- 결과는 error와 같이 login 페이지에 로그아웃 메시지가 나타난다.
References
https://docs.spring.io/spring-security/site/docs/3.0.x/reference/el-access.html
15. Expression-Based Access Control
There are some built-in expressions which are specific to method security, which we have already seen in use above. The filterTarget and returnValue values are simple enough, but the use of the hasPermission() expression warrants a closer look. The Permiss
docs.spring.io
https://docs.spring.io/spring-security/site/docs/current/reference/html5/
Spring Security Reference
In Spring Security 3.0, the codebase was sub-divided into separate jars which more clearly separate different functionality areas and third-party dependencies. If you use Maven to build your project, these are the modules you should add to your pom.xml. Ev
docs.spring.io
'Spring > 이론' 카테고리의 다른 글
| Apache Tiles (0) | 2020.04.08 |
|---|---|
| Logging (SLF4J and Logback) (0) | 2020.04.01 |
| Spring Web Form (0) | 2020.03.25 |
| MVC(Model-View-Controller) (0) | 2020.03.17 |
| DB 연동(with Spring JDBC) (0) | 2020.03.09 |


댓글